Documentation
Azzle-Ai
Welcome to the documentation for the Azzle React Template!
This guide will help you understand the structure of the
template, its components, and how to effectively use and
customize it for your projects.
Installation
Hello! Welcome to Azzle's official documentation. Simple,
Flexible, ready to use React Template which will bring you so
much closer to your end goals. Let’s dive in.
Prerequisites
React is constructed leveraging
Node.js.
as its foundation. To initiate your journey with React, it's
essential to have an up-to-date version of Node.js and For
managing routing within your React application, the
employment of
React Router DOM
is necessary.
Installing Development Environment
We require many packages (dependencies) to run our site.
Move into
/azzle-ai (project root) directory and run
command below.
npm install
After the installation, you should have a folder named
/node_modules in the project root directory..
How To Run Development Server
To start our development server run command below:
npm run dev
Open your browser and visit
http://localhost:5173!. You should see a page like below.

Awesome! You are a genious.
Now open the code editor and start hacking!
CLI Commands
Some useful commands to work with the project.
1. npm run dev to
Start development server at
http://localhost:5173
2. npm run build for
Generating production build
3. npm run preview To
serve build files at
http://localhost:4173
File Structure
Follow the steps below to setup your site template:
-
Unzip the downloaded package and open the
/azzle-ai folder to find all the template
files. You will need to upload these files to your hosting
web server using FTP or localhost in order to use it on your
website.
-
Below is the folder structure and needs to be uploaded to
your website or localhost root directory:
-
azzle-react/src/components - Component
files
azzle-react/src/hooks - Hooks filesazzle-react/src/pages - All pages-
azzle-react/public/assets - Asset files
azzle-react/src/styles - Style filesazzle-react/index.html - Root file
-
You should upload all or specific React files as per your
need.
- You are good to go for adding your content now!
Tailwind CSS
We have integrated Tailwind CSS for styling in the template.
If you're familiar with Tailwind CSS, you can modify the
Tailwind configuration file
tailwind.config.js to customize the design
according to your requirements.
The styles are organized in the
src/style directory. You can locate the
style.css file within this directory, which
serves as the entry point for Tailwind CSS. Here, you can
customize Tailwind's utility classes and extend them as
needed.
To make changes, navigate to the
src/style directory and edit the
style.css file based on your preferences.
Tailwind's utility-first approach allows for quick and
efficient styling adjustments.
If you require a more advanced setup, you can edit the
respective files yourself within the same folder. Tailwind
provides modular CSS files, allowing you to include only the
necessary styles for your project. You can manage these styles
in your style.css file.
Feel free to leverage Tailwind's extensive utility classes to
minimize the CSS output and include only the styles required
for your components. This can be achieved by configuring your
tailwind.config.js
file to include only the necessary utilities.
Logo Settings
Replace logo with same name:
You can update the logo by simply replacing it with a new logo
of the same name.
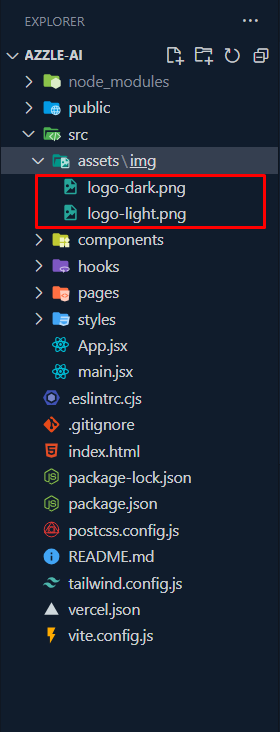
To replace the logo in your project, follow these simple steps:
1. Navigate to the src/assets/img directory
within your project.
2. Locate the existing logo file that you wish to replace.
Ensure that the replacement logo you have matches the same
file format (e.g., PNG, JPG) and has the same name as the
original logo file.
3. Once you've found the original logo file, simply replace it
with your new logo file. Make sure to use the same filename to
ensure that the project references the new logo correctly.
4. After replacing the logo file, any references to the logo
throughout your project will automatically reflect the
changes, as long as they are referencing the file by its
filename.
5. You may need to restart your development server or rebuild
your project for the changes to take effect, depending on your
development environment.
6. That's it! You've successfully replaced the logo in your
project.
Stricture
Documentation and examples for header, footer, layout and Root
App.jsx
Pages
Pages Structure:
In the azzle-react/src/pages directory, you'll
find two folders: common and home

Common Pages :
The common folder contains pages that are shared
and can be used across different sections of the application.
These pages, such as login and signup, are designed to be
reusable and can be integrated with any other home pages.
Home Pages :
Within the home folder, you'll discover four
distinct home pages. Each home page represents a unique layout
or design variation for the main landing page of the
application.
Summary of App.jsx and Layout.jsx
-
App.js Component:
- Sets up the routing for the application.
-
Defines specific routes for home, login, signup, blog,
and error pages.
-
Uses the
< Layout /> component to provide a
consistent layout structure.
-
Layout.jsx Component:
-
Provides a layout structure for the entire application.
-
Includes the header, main content area, and footer.
-
Uses the
< Outlet /> component to render
nested child components based on routes.
Content
Documentation and examples for displaying typography, table,
image and video and more..
Typography
Documentation and examples for typography, headings, body
text, lists, and more.
Headings
| Heading |
Example |
<h1></h1>
|
h1. Heading
|
<h2></h2>
|
h2. Heading
|
<h3></h3>
|
h3. Heading
|
<h4></h4>
|
h4. Heading
|
<h5></h5>
|
h5. Heading
|
<h6></h6>
|
h6. Heading
|
Inline Text elements
You can use the mark tag to highlight text.
This line of text is meant to be treated as deleted
text.
This line of text is meant to be treated as no longer
accurate.
This line of text is meant to be treated as an addition to
the document.
This line of text will render as underlined
This line of text is meant to be treated as fine
print.
This line rendered as bold text.
This line rendered as italicized text.
<p>You can use the mark tag to <mark>highlight</mark> text.</p>
<p><del>This line of text is meant to be treated as deleted text.</del></p>
<p><s>This line of text is meant to be treated as no longer accurate.</s></p>
<p><ins>This line of text is meant to be treated as an addition to the document.</ins></p>
<p><u>This line of text will render as underlined</u></p>
<p><small>This line of text is meant to be treated as fine print.</small></p>
<p><strong>This line rendered as bold text.</strong></p>
<p><em>This line rendered as italicized text.</em></p>
Icons
The
React Icons
library is a popular set of icon components for React
applications. It provides a collection of icon components that
can be easily integrated into your React projects, allowing
you to add icons to your user interface without the need for
external image files.
FAQ
A FAQ is a list of frequently asked questions (FAQs) and
answers on a particular topic.
Yes. You can customize our items to fit the needs of
your end product
Royalty free means you just need to pay for rights
to use the item once per end product. You don't need
to pay additional or ongoing fees for each person
who sees or uses it.
Please note that there may be some limits placed on
uses under the different license types available on
the marketplaces.
The item is what you purchase from Envato Market.
The end product is what you build with that item.
- You can buy a web template, add your text and
images, and use it as your website.
- You can buy an HTML site template, convert it to
WordPress, and use it as your website (but not as a
stock template for sale).
Contact through ui8 support
.
Source & Credits
Images:
Fonts:
- Icons Font Face
- Custom Icon Font
- Typography Font
Packages:
- bootstrap 5
- react
- react-dom
- react-router-dom
- react-animated-cursor
- react-modal-video
- react-icons
- react-odometerjs
- sass
- aos
- gsap
- swiper
- swiper-react
Changelog
See what's new added, changed, fixed, improved or updated in
the latest versions.
Version 1.0
Initial Release